Wednesday, December 31, 2008

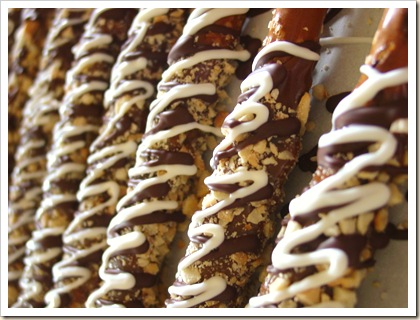
Caramel, Cashew and Chocolate coated Pretzels

Kristen's Food December 2008 081

I hope that everyone had a great Christmas.  My husband made it back from his trip on Christmas Eve despite the crazy weather so I was very glad that we were all able to spend Christmas together.  I can't believe that it is all over and that we are starting a new year.  Where does the time go?  Remember when you were a kid and it seemed like time went so slow.  It always took so long to get to your birthday and to Christmas.  Now you turn around and another year has passed.

Enough of that, I should get on to the food.  I have been baking up a storm this season but unfortunately I didn't take pictures of most of it.  I know, what was I thinking?  A friend of mine paid me to make her holiday treats so I made 150 mint chocolate brownies covered with a mint chocolate ganache.  Absolutely delicious, but I only took one measly picture.  They were delicious though and it was really nice to have someone pay me to bake.  

Kristen's Food December 2008 067

While I was making the brownies, I got a call from my mother-in-law who asked me to make her 160 cookies for some treat bags that she was putting together.  My mother-in-law is an amazing cook and baker so it was an honor for her to ask me to bake for her.  She had run out of time and needed them the next day so I had to put together those quickly.  Yet again, one measly picture.

Kristen's Food December 2008 062

After all that baking, I still needed to put together my treats.  I decided to make these delicious pretzels that I dipped in chewy caramel, rolled in chopped cashews and then drizzled them with dark and white chocolate.  Can I say if these were a drug, I would be an addict.  I love the combination of salty and sweet and this one worked perfectly.  The sweet, creamy, chewy caramel and the salty nuts and pretzel were amazing.  Can you believe that after making these that I took not one picture?!    I think that I was just tired or something.  But, luckily, I needed to make some more today because I didn't get around to everyone before Christmas.  It's never to late for treats though, right?!

Kristen's Food December 2008 076

Caramel Cashew and Chocolate Covered Pretzels

40 pretzel rods

One batch caramel (recipe follows)

1 ½ pounds chopped cashews

10 oz dark chocolate

10 oz white chocolate

1. Dip the pretzel rods into the slightly cooled caramel and then roll into the cashews. Place on a cookie sheet lined with parchment paper and allow to set up. After a few minutes, turn the pretzels over and reshape the caramel that has pooled on the bottom. Allow to cool completely.

2. Melt the dark chocolate over a double broiler, stirring frequently. Remove from heat when it is almost all melted. Stir until completely melted. Pour into a Ziploc freezer bag and clip a small hole in the corner. Drizzle the pretzels with the dark chocolate. Repeat with the white chocolate. Allow the chocolate to set up.

Caramel

1-pound box dark brown sugar
1 cup (2 sticks) unsalted butter, room temperature
1 14-ounce can sweetened condensed milk
1 cup dark corn syrup
1/2 teaspoons vanilla extract
1/4 teaspoon salt
Whipping cream (if necessary)

Combine all ingredients except for the whipping cream in heavy 2 1/2-quart saucepan (about 3 inches deep). Stir with wooden spatula or spoon over medium-low heat until sugar dissolves (no crystals are felt when caramel is rubbed between fingers), occasionally brushing down sides of pan with wet pastry brush, about 15 minutes.
Attach clip-on candy thermometer to side of pan. Increase heat to medium-high; cook caramel at rolling boil until thermometer registers 236°F, stirring constantly but slowly with clean wooden spatula and occasionally brushing down sides of pan with wet pastry brush, about 12 minutes. Pour caramel into glass bowl (do not scrape pan).

If caramel becomes too thick to dip into, add 1 to 2 tablespoons whipping cream and briefly whisk caramel in bowl over low heat to thin.

Tuesday, December 16, 2008

Chocolate sugar cookies

Well, I have kind of given up on the 12 days of cookie thing but I still plan on sharing more treats before the holidays.  I guess it wasn't the best idea to start that while I was working every night until midnight.  Things around here have been a little crazy.  I am so not ready for Christmas.  I haven't even been shopping!  I have just been so tired from working and trying to get the things around the house done.  I don't know how single parents do it?!  Anyway, now onto the cookies. 

Today, my kids and I went out to lunch with my Grandma.  After lunch was over, they were begging me for one of the cookies that was sitting in the display case.  Of course I said no but I prefaced that "No" with the promise of going home and making cookies.  When I asked them what kind they wanted to make, they all agreed on sugar cookies.  I thought that it would be fun to try to make chocolate sugar cookies.  To please everyone, I made one batch of chocolate and one batch of regular sugar cookie dough.

When it came to frosting these little cookies, I realized that I was all out cream cheese which is my staple for frosting.  So to top these off, we decided to make an almond glaze which went really well with the chocolate cookies and only took a minute to make.

Chocolate Sugar Cookies

6 Tbs butter, softened

1 cup sugar

1 egg

1 tsp. vanilla

1/2 cup heavy cream

1 tsp. fresh lemon juice

2 1/2 cups flour

1/2 cup cocoa powder

1/2 tsp. baking soda

1 tsp. baking powder

1/4 tsp salt

1.  In a cup combine the heavy cream and the lemon juice and set aside to curdle the milk.  In the bowl of a mixer fitted with the paddle attachment, cream together the butter and sugar until fluffy.  While it's mixing, combine the dry ingredients into a large bowl stir to combine all the dry ingredients.

2.  Add the egg to the butter and sugar mixture and mix until well combined, scraping down the sides of the bowl as needed.Add teh vanilla and mix to combine.

3.  Add 1/3 of the flour mixture to the butter  mixture and mix just to combine.  Add half of the cream mixture and mix to combine then follow that with half of the remaining flour.  Repeat with the remaining cream and then flour.  Mix only until just combined.

4.  Separate the dough into two discs and wrap in plastic wrap.  refrigerate for at least one hour. 

5.  Preheat the oven to 350°.  On a well floured surface, roll out the dough to desired thickness and cut with cookies cutters.  Bake for 7-9 minutes cookies are set in the middle.  Remove to a cooling rack.  Once cooled, frost as desired.

Almond Glaze

1 1/2 cups powdered sugar

1/2 tsp. almond extract

2-4 Tbs. heavy cream or milk

1.  Mix all of the ingredients adding more milk until the glaze has reached desired consistency.  Dip the top of each cookie into the glaze and place on cooling wrack to allow the glaze to set.

Friday, December 12, 2008

12 Days of Cookies: Caramels

Ok, so caramels aren't really cookies, but they are definitely something that I needed to include since I make them for my holiday treat plates.  This recipe was actually an extension of last months Daring Bakers Challenge.  We had the option of making these caramels along with the caramel cake.  I ran out of time last month but still wanted to give them a try.  I have used several different recipes for caramel and I wanted to see how this one measured up.  They were chewy and creamy with a hint of vanilla.  Absolutely delicious!


VANILLA BEAN CARAMELS
from Pure Dessert by Alice Medrich, Artisan Press, Copyright 2007, ISBN: 978-1579652111

Ingredients

1 cup golden syrup ( I used 1/2 cup light corn syrup and 1/2 cup dark corn syrup)
2 cups sugar
3/8 teaspoon fine sea salt
2 cups heavy cream
1 1/2 teaspoons pure ground vanilla beans, purchased or ground in a coffee or spice grinders, or 1 tablespoon plus 1 teaspoon pure vanilla extract
3 tablespoons unsalted butter, cut into chunks, softened


Equipment
A 9-inch square baking pan
Candy thermometer
Procedure

Line the bottom and sides of the baking pan with aluminum foil and grease the foil. Combine the golden syrup, sugar, and salt in a heavy 3-quart saucepan and cook over medium heat, stirring with a silicone spatula or wooden spoon, until the mixture begins to simmer around the edges. Wash the sugar and syrup from the sides of the pan with a pastry brush dipped in water. Cover and cook for about 3 minutes. (Meanwhile, rinse the spatula or spoon before using it again later.)

Uncover the pan and wash down the sides once more. Attach the candy thermometer to the pan, without letting it touch the bottom of the pan, and cook, uncovered (without stirring) until the mixture reaches 305°F. Meanwhile, combine the cream and ground vanilla beans (not the extract) in a small saucepan and heat until tiny bubbles form around the edges of the pan. Turn off the heat and cover the pan to keep the cream hot.

When the sugar mixture reaches 305°F, turn off the heat and stir in the butter chunks. Gradually stir in the hot cream; it will bubble up and steam dramatically, so be careful. Turn the burner back on and adjust it so that the mixture boils energetically but not violently. Stir until any thickened syrup at the bottom of the pan is dissolved and the mixture is smooth. Continue to cook, stirring occasionally, to about 245°F. Then cook, stirring constantly, to 260°f for soft, chewy caramels or 265°F; for firmer chewy caramels.

Remove the pan from the heat and stir in the vanilla extract, if using it. Pour the caramel into the lined pan. Let set for 4 to 5 hours, or overnight until firm.
Lift the pan liner from the pan and invert the sheet of caramel onto a sheet of parchment paper. Peel off the liner. Cut the caramels with an oiled knife. Wrap each caramel individually in wax paper or cellophane.


Variations
Fleur de Sel Caramels
: Extra salt, in the form of fleur de sel or another coarse flaked salt, brings out the flavor of the caramel and offers a little ying to the yang. Add an extra scant 1/4 teaspoon of coarse sea salt to the recipe. Or, to keep the salt crunchy, let the caramel cool and firm. Then sprinkle with two pinches of flaky salt and press it in. Invert, remove the pan liner, sprinkle with more salt. Then cut and wrap the caramels in wax paper or cellophane.

Nutmeg and Vanilla Bean Caramels: Add 1/2 teaspoon freshly grated nutmeg to the cream before you heat it.
Cardamom Caramels: Omit the vanilla. Add 1/2 teaspoon slightly crushed cardamom seeds (from about 15 cardamom pods) to the cream before heating it. Strain the cream when you add it to the caramel; discard the seeds.


Caramel Sauce: Stop cooking any caramel recipe or variation when it reaches 225°F or, for a sauce that thickens like hot fudge over ice cream, 228°F. Pour it into a sauceboat to serve or into a heatproof jar for storage. The sauce can be stored in the refrigerator for ages and reheated gently in the microwave or a saucepan just until hot and flowing before use. You can stir in rum or brandy to taste. If the sauce is too thick or stiff to serve over ice cream, it can always be thinned with a little water or cream. Or, if you like a sauce that thickens more over ice cream, simmer it for a few minutes longer.

Wednesday, December 10, 2008

12 Days of Cookies: Sables

There are very few things that are more mouthwatering than crumbly butter cookies.  They just about melt in your mouth and have a smooth and sweetly buttery taste.  The sugar crystals on the edges give them a slight crunch.  These are great dipped in chocolate too or flavored with nuts or lemon zest.  You can also substitute some of the flour for cocoa powder to make chocolate sables.  These really are a very versatile cookie which are perfect for any holiday cookie plate.

Sables

1 cup (2 sticks) butter, softened

1/4 cup powdered sugar,sifted

1/2 cup sugar

1/2 tsp. salt

2 large egg yolks, room temperature

2 cups flour

for brushing

egg yolk, beaten

course sugar

1.  In bowl of a mixer fitted the paddle attachment, beat the butter until creamy.  Add the sugars a and salt and beat just until incorporated.  With the mixer on low, add the yolks one at a time and mix to incorporate.  Dump the flour in a mix just until the flour disappears.  Give the dough one last mix by hand.

2.  Divide the dough in half and place on wax paper forming into logs.  Refrigerate for several hours.  The dough can also be frozen for a few months.

3.  Preheat the oven to 350°.  Brush one of the logs with a little of the beaten egg yolk and roll into the sugar to coat.  Carefully cut the dough using a sawing motion.  Place onto a baking sheet lined with parchment paper and bake for 15-20 minutes.

Monday, December 8, 2008

12 days of Cookies: Cartwheels

In hopes of being better prepared for Christmas this year, I have decided to start my holiday baking.  I thought it would be fun to share some of my favorite cookies/treats that I like to make for the holidays.  My hope is to share a new cookie or treat everyday for the next 12 days, which will take us pretty close to Christmas and should hopefully complete my holiday baking.

For my first day I thought I would share my Nana's Cartwheels.  She came up with these little gems to use up the extra pie dough from all of those extra holiday pies.  Now as a family we make extra pie dough in order to make these.  They are flaky, slightly chewy and covered in cinnamon and sugar.  The aroma when they bake is heavenly, and really, where where can you go wrong with pie dough, butter, cinnamon and sugar.

Cartwheels

Pie dough:
3 cups flour
1 tsp salt
1 heaping cup of shortening
cold water


1. Make the pie dough: Add the flour and salt to a large mixing bowl and mix to combine. Using two butter knives, cut in the shortening until it is the size of small peas. Move most of the mixture to one side. Sprinkle a Tablespoon or two of water over the small section of dough and mix with a fork to combine. Don’t over mix though. Pull a little more of the flour mixture over to the side; add another Tablespoon or so of water and mix. The dough should just come together but not be too wet or too dry. Continue this until all of the dough has been mixed with water. The amount of water will vary each time that you make it so don’t rely on any specific measure. I usually start out with a cup of cold water and don’t use all of it.
Shape the dough into 2 discs and wrap with plastic wrap. Refrigerate for at least 1 hour or overnight.

pie dough
About 2 1/2 Tbs. of softened butter per disc of dough
about 1/3 cup packed brown sugar
cinnamon


1. Preheat the oven to 350°. Roll the pie dough out into a thin rectangle. Spread lightly with softened butter. Sprinkle with brown sugar and rub it all over the surface of the dough lightly covering the whole surface. Sprinkle evenly with cinnamon. Roll up like a jelly roll pinching the ends. Place seam side down onto a lightly greased cookie sheet curving the dough into a semi-circle. Make thin slices in the dough making sure not to cut all the way through the dough.  Sprinkle to top with a little white sugar if desired.

2. Bake for about 30-35 minutes or until the top is lightly browned and the filling is beginning to bubble out the sides.  Be careful not to overcook as they will firm up more when they cool. Let cool and slice into pieces using the slits in the dough as a guide.

Saturday, November 29, 2008

Caramel Cake with the Daring Bakers


I hope that everyone had a great Thanksgiving.  I had a great time with all of my family.  I was really relaxed this year despite having 40 people over.  We had so much food.  In fact, we had a whole turkey left over which we didn't even carve.  My fridge is stocked with leftovers and several yummy pies which I am eating bite by bite right out of the pie plates.  I think this year could be the year that I gain a few extra pounds over the holidays.  It's just so hard to resist all of the delicious food.

Of course then there's the Daring Baker's challenge which came right after Thanksgiving.  Of course I had to be a procrastinator and was up finishing it tonight after 9 hours of work.  I am so tired so if this post doesn't make sense, forgive me.

This months challenge was a recipe form Shuna Fish Lydon for Caramel Cake with Caramelized Butter Frosting.  Our hosts this month were Dolores from Culinary Curiosity, Alex from Brownie of the Blondie and  Jenny of  Foray into Food. And for those gluten free bakers Natalie of Gluten-a-Go-Go  lent a hand too.

I decided to halve the recipe and make cupcakes instead of one large cake because I really need more dessert around here just like I need a hole in my head.  Instead of lining my pan with liners I put in little squares of parchment.  I reduced the sugar slightly on the cupcakes and frosting after reading several posts about how sweet they both were.  Overall, my favorite part of this challenge was the frosting and let me tell you, I usually don't like frosting.  This one has a really caramely flavor from the brown butter and the caramel syrup.  It is absolutely delicious.  The cake was good too with a nice moist ,tight crumb.  I thought that it lacked a little caramel flavor.  I think next time I will  add a little more of the caramel syrup.

Overall, the challenge was quick easy and delicious.  I will be keeping that frosting recipe on hand for future use.  I can't wait to see what the Daring Bakers will have in store for us next month!

Caramel Cake With Caramelized Butter Frosting:

10 Tablespoons unsalted butter at room temperature
1 1/4 Cups granulated sugar
1/2 teaspoon kosher salt
1/3 Cup Caramel Syrup (see recipe below)
2 each eggs, at room temperature
splash vanilla extract
2 Cups all-purpose flour
1/2 teaspoon baking powder
1 cup milk, at room temperature

Preheat oven to 350F. Butter one tall (2 – 2.5 inch deep) 9-inch cake pan.

In the bowl of a stand mixer fitted with a paddle attachment, cream butter until smooth. Add sugar and salt & cream until light and fluffy.

Slowly pour room temperature caramel syrup into bowl. Scrape down bowl and increase speed. Add eggs/vanilla extract a little at a time, mixing well after each addition. Scrape down bowl again, beat mixture until light and uniform.

Sift flour and baking powder. Turn mixer to lowest speed, and add one third of the dry ingredients. When incorporated, add half of the milk, a little at a time. Add another third of the dry ingredients, then the other half of the milk and finish with the dry ingredients. {This is called the dry, wet, dry, wet, dry method in cake making. It is often employed when there is a high proportion of liquid in the batter.}

Take off mixer and by hand, use a spatula to do a few last folds, making sure batter is uniform. Turn batter into prepared cake pan. Place cake pan on cookie sheet or 1/2 sheet pan. Set first timer for 30 minutes, rotate pan and set timer for another 15-20 minutes. Your own oven will set the pace. Bake until sides pull away from the pan and skewer inserted in middle comes out clean. Cool cake completely before icing it. Cake will keep for three days outside of the refrigerator.

Caramel Syrup:
2 cups sugar
1/2 cup water
1 cup water (for "stopping" the caramelization process)

In a small stainless steel saucepan, with tall sides, mix water and sugar until mixture feels like wet sand. Brush down any stray sugar crystals with wet pastry brush. Turn on heat to highest flame. Cook until smoking slightly: dark amber.
When color is achieved, very carefully pour in one cup of water. Caramel will jump and sputter about! It is very dangerous, so have long sleeves on and be prepared to step back.
Whisk over medium heat until it has reduced slightly and feels sticky between two fingers. {Obviously wait for it to cool on a spoon before touching it.}

Caramelized Butter Frosting:
12 tablespoons unsalted butter
1 pound confectioner’s sugar, sifted
4-6 tablespoons heavy cream
2 teaspoons vanilla extract
2-4 tablespoons caramel syrup
Kosher or sea salt to taste

Cook butter until brown. Pour through a fine meshed sieve into a heatproof bowl, set aside to cool.

Pour cooled brown butter into mixer bowl. In a stand mixer fitted with a paddle or whisk attachment, add confectioner's sugar a little at a time. When mixture looks too chunky to take any more, add a bit of cream and or caramel syrup. Repeat until mixture looks smooth and all confectioner's sugar has been incorporated. Add salt to taste.

Note: Caramelized butter frosting will keep in fridge for up to a month.To smooth out from cold, microwave a bit, then mix with paddle attachment until smooth and light.

Overall, I think the frosting is a keeper, I will keep that recipe tucked away for another time.  the cake was alright but nothing to jump through hoops for.  It was a fun and easy challenge.  I can't wait to see what next month will bring!

Thursday, November 20, 2008

Individual Apple Pies

Kristen's Food November 2008 109 

I can't believe that November is just about over and that Thanksgiving is next week.  Were does the time go?  I love that we have a holiday where we can be gluttons.  I am already dreaming about all of the yummy food.  We usually have so much food that we are eating Thanksgiving for about a week.  I can't wait for the mashed potatoes and roasted veggies and stuffing and pie and...the list could go on and on.

I will be hosting Thanksgiving dinner again this year which means 30+ people will be invading my house.  We will cook 2 huge turkeys and a ham, 20 pounds of mashed  potatoes, stuffing, yams corn, rolls, squash and probably about 8-10 pies.  I love pie.  My mom would make me pie every year for my birthday so I have an affinity for good pie.  In fact, as I am typing this, I am eating the pie from the pictures and boy is it good.

This pie recipe is great if you are having a small Thanksgiving and would like to treat everyone to their own mini pies.  Obviously it won't work for my large gathering unless I was a masochist and wanted to stay up all  night baking a million little pies.   It would work well for any leftover pie dough that you have and is a great late night snack.  All you need are some little pot pie tins or ramekins, I think some mini tart pans would also work great.  I used a 6 oz. glass ramekin which worked perfectly.  There is nothing fancy about this pie, just the traditional apple pie.  If you wanted to change it up a bit you could throw in some chopped up caramels and toss in a few pecans or use some orange blossom honey in place of the sugar with a little added citrus zest.  You really can individualize this pie.  So, if you have a hankering for some apple pie, give this one a go.

Individual Apple Pies

 Kristen's Food November 2008 112

Pie dough

3 cups flour, spooned and leveled

1/4 tsp salt

2 Tbs. sugar

1/2 cup shortening

1/2 cup (1 stick) chilled butter cut into small pieces

Ice water

1.  In a large bowl, stir together the flour, sugar and salt.  Add the shortening and the butter and cut it into the flour using two knives or a pastry cutter.  You want the pieces of butter and shortening to be about the size of peas.

2.  Once the mixture is combined, move most of it to one side of the bowl.  Pour a Tablespoon of water over the small bit of flour mixture and pull the dough together with a fork.  Try to work the dough very little as overworking it will cause the gluten to form and will toughen the crust.  Move the moistened dough aside and pull aside some more of the dry flour mixture and repeat until the dough is moist enough to be formed into a ball.

3.  Separate the dough into 1/2 cup size balls of dough, wrap in plastic wrap and chill for at least an hour.

for each individual pie

2 granny smith apples

1/4 cup sugar

2 tsp. flour

1 tsp. cinnamon

juice of 1/2 a small lemon

1 tsp butter cut into small pieces

for the glaze

1 egg yolk

2 tsp. heavy cream

sugar for sprinkling on top

1. Preheat the oven to 375°.  Peal, core and thinly slice the apples.  Sprinkle with the lemon juice and toss to combine.  Add the sugar, cinnamon and flour and toss to combine.  Set aside.

2.  Grease your ramekins.  Roll out one piece of dough at a time, you want the dough to be fairly thin as there is a large ratio of dough to apples.  Roll up onto rolling pan and then fit into the ramekin.  Trim the edges, leaving a little overhang.  Fill with the apples, you ant to mound up the apples as they will shrink down as they cook.  Top with the pieces of butter.

3.  Roll out a second piece of dough and either fit to the top of the pie or cut into strips for a lattice pattern.  If not using the lattice pattern, don't forget to poke holes in the top crust to allow the steam to escape.  Tuck the ends under with the bottom crust.

4.  Mix together the glaze ingredients and brush lightly onto the top crust.  Sprinkle with a little sugar.  Place on baking sheet to catch drips and bake for 30 minutes.  Cover the tops of the pies with foil and then bake for an additional 15-20 minutes or until bubbling and cooked through.  Let cool before eating.