Showing posts with label cheesecake. Show all posts

Thursday, October 16, 2008

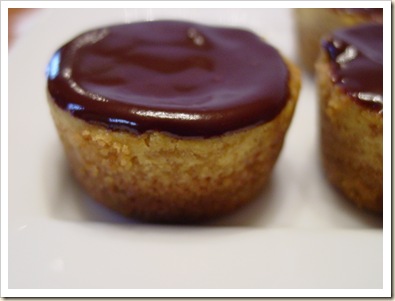
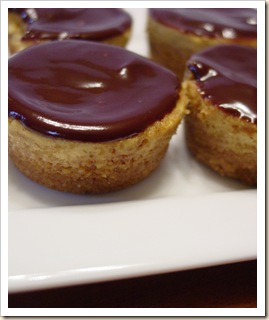
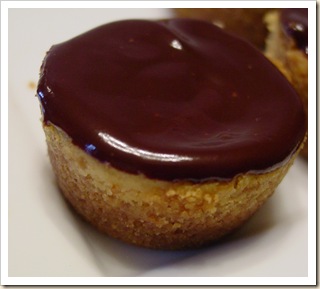
Mini Pumpkin Cheesecakes with Chocolate Ganache

Kristen's Food October 2008 078

I am going to start by saying that I love cheesecake. It is probably my one major vice out of all desserts. Most others I can put down and not eat after a few bites, but cheesecake is another story. In fact, when I made the cheesecake for a Daring Baker's challenge a few months ago I ate the whole thing , by myself. Now we aren't talking about a small cheesecake, we are talking about a 13x9 pan full of cheesecake. I left it in the fridge with a fork and would just come back throughout the day for a few little bites. Before I knew it, the cheesecake was gone.

I have been wanting to make cheesecake for a few weeks now. And was planning on making a full pan of cheesecake, but over the weeks, I used the cream cheese for other things. So, when I decided to make the these yesterday I only had one package of cream cheese left. I decided that the cheesecake would have to be mini. Now, this could be just as dangerous, the cheesecakes are perfectly bite size and just waiting there in the fridge for me to eat them. I had some pumpkin left over from those cookies and also some chocolate ganache from a cake and so I thought that I'd use those up too.

These little cheesecakes with pumpkin and chocolate turned out so delicious. I really need to get them out of the house before I eat them all! I tell you what, I could not for the life of me get my pumpkin hating husband to try these. So, more for me, he doesn't know what he is missing out on.

Mini Pumpkin Cheesecakes with Chocolate GanacheKristen's Food October 2008 069
6 long sheets of graham crackers

1 Tbs. sugar

a pinch of salt

2 Tbs. butter, melted

1 pkg. (8oz.) cream cheese, softened

1/3 cup sugar

1 egg, room temperature

1/2 tsp vanilla

a pinch of salt

1 1/4 tsp pumpkin pie spice

1/3 canned pumpkin

1. Preheat the oven to 350°. Spray a mini muffin pan with cooking spray and set aside.

2. Add the graham crackers, sugar and salt to food processor and process until graham crackers are fine crumbs. With the machine running, add the melted butter and mix to combine.

3. Put about 1 Tbs. of the crumb mixture into each mini muffin cup (it will make 16 mini cheesecakes). Press the crumbs into each cup. Bake the crusts for 8 minutes. Remove from oven and let cool on cooling rack while you mix the filling. Reduce the oven temperature to 325°. Bring a pot of water to a boil.

4. Rinse out the food processor. In food processor cream the cream cheese until smooth, scraping down the sides as needed. Add the sugar and cream for another minute or two. Add the egg and mix for another minute or two. Scrape down the sides as needed. Add the vanilla, salt, pumpkin pie spice and pumpkin and mix for another minute to combine. Scrape down the side and the bottom of the bowl and give it one last quick mix.

5. Pour the mixture into the crusts, filling to the top. Place the muffin pan onto a baking sheet. Place in the oven. Carefully pour the water into the baking pan being sure not to let it get into the muffin tin. you want the water to come about halfway up the muffin pan. Bake the cheesecakes at 325° for about 24 minutes. Carefully remove the muffin pan from the baking sheet and let cool on a cooling rack for 20 minutes. Then refrigerate them in the pan for another 30 minutes.

6. Carefully run a small thin knife around the edges of each cheesecake and pop them out the pan. Pour about a teaspoon of ganache (recipe follows) onto each cheesecake and spread if desired. Return to the fridge to let the ganache harden.

Chocolate Ganache

This recipe will make a lot more than you need (about 1 cup) but you can cut the recipe in half or make the entire batch and freeze the leftovers for a cake, truffle or a tart.Kristen's Food October 2008 075
6 oz. (good) semisweet or bittersweet chocolate, like Lindt
6 oz. (¾ cup heavy cream
1 Tbsp. light corn syrup
¾ tsp. vanilla

1. Break the chocolate into 1-inch pieces and place in the basket of a food processor and pulse until finely chopped. Transfer into a medium sized bowl and set aside.

2. Heat the cream and corn syrup in a saucepan, on low, until it reached a gentle boil. Once boiling, immediately and carefully pour over the chocolate. Leave it alone for one minute, then slowly stir and mix the chocolate and cream together until the chocolate is melted and incorporated into the cream. Carefully blend in vanilla. The glaze will thicken, but should still be pourable. If it doesn’t thicken, refrigerate for about 5 minutes, but make sure it doesn’t get too cold!

Sunday, April 27, 2008

Cheesecake pops with the Daring Bakers

food April 2008 081 #2

Here it is, the end of the month already and time for another installment of the Daring Bakers. This months challenge was hosted by Deborah from Taste and Tell and Elle from Feeding My Enthusiasms. I have to say that I was so excited when I found out that the challenge was Cheesecake pops. Cheesecake is one of my all time favorite desserts and I knew that I would have no problem making and eating this delectable treat.

pink_db

The recipe was pretty straight forward. Bake a crustless cheesecake in a water bath, chill and scoop into balls. Freeze the balls with a lollipop stick in them and then dunk in tempered chocolate and coat with various toppings. The only thing that I found wrong with the recipe was the baking time. The recipe called to bake the cheesecake for 35-45 minutes and mine took about 60. That is a pretty huge discrepancy, but it seems that many of the Daring Bakers had the same problem. It makes me wonder if the recipe was written wrong in the cookbook as I have never baked so large a cheesecake in less than 50-60 minutes. Luckily having baked several cheesecakes before, I knew not to take it out so early.

The recipe turned out a silky smooth cheesecake that was extremely delicious. I will admit that I only made half of the recipe into the pops (which still gave me 30-40 pops). The rest I ate bite by bite throughout the day gaining me 5 extra pounds that week, but oh was it worth it! (I just can't resist cheesecake!!!)

I treated the cheesecake pops like caramel apples. I dressed part of the batch in dark chocolate and sprinkles, another part of the batch with dark chocolate, walnuts and chewy caramel. The last part of the batch I dipped directly into the hot chewy caramel and then into walnuts and then drizzled them with dark chocolate. I did have a bit of trouble dipping them into the caramel as it needed to be at a higher temperature to be thin enough to dip. This caused the cheesecake to start to melt a little and 2 or three of the bites fell off of the sticks. No matter they still tasted delicious with their chewy outer shell and their velvety centers. All in all it was a great challenge and one that I am likely to repeat.

food April 2008 067#2

Cheesecake Pops

food April 2008 064 #3

adapted from Sticky, Chewy, Messy, Gooey by Jill O’Connor
Makes 30 – 40 Pops (or more if you make them small like I did)

5 8-oz. packages cream cheese at room temperature
2 cups sugar
¼ cup all-purpose flour
¼ teaspoon salt
5 large eggs (I used 3 eggs when I baked half the recipe without a problem)
2 egg yolks
1 vanilla bean, seeded
¼ cup heavy cream
Thirty to forty 8-inch lollipop sticks
1 pound chocolate, chopped or in chips
2 tablespoons vegetable shortening
(Note: White chocolate is harder to use this way, but not impossible)
Assorted decorations such as chopped nuts, colored jimmies, crushed peppermints, mini chocolate chips, sanding sugars, dragees) I also used cut chocolate transfer sheets.
Position oven rack in the middle of the oven and preheat to 325 degrees F. Set some water to boil.
In a large bowl, beat together the cream cheese, sugar, flour, and salt until smooth. If using a mixer, mix on low speed. Add the whole eggs and the egg yolks, one at a time, beating well (but still at low speed) after each addition. Beat in the vanilla and cream.
Grease a 10-inch cake pan (not a springform pan), and pour the batter into the cake pan. Place the pan in a larger roasting pan. Fill the roasting pan with the boiling water until it reaches halfway up the sides of the cake pan. Bake until the cheesecake is firm and slightly golden on top, 35 to 45 minutes. (Mine took 55-60 minutes)
Remove the cheesecake from the water bath and cool to room temperature. Cover the cheesecake with plastic wrap and refrigerate until very cold, at least 3 hours or up to overnight.
When the cheesecake is cold and very firm, scoop the cheesecake and place on a parchment paper-lined baking sheet. Carefully insert a lollipop stick into each cheesecake ball. Freeze the cheesecake pops, uncovered, until very hard, at least 1 to 2 hours.
When the cheesecake pops are frozen and ready for dipping, prepare the chocolate. In the top of a double boiler, set over simmering water, or in a heatproof bowl set over a pot of simmering water, heat half the chocolate and half the shortening, stirring often, until chocolate is melted and chocolate and shortening are combined. Stir until completely smooth. Do not heat the chocolate too much or your chocolate will lose it’s shine after it has dried. Save the rest of the chocolate and shortening for later dipping, or use another type of chocolate for variety.
Alternately, you can microwave the same amount of chocolate coating pieces on high at 30 second intervals, stirring until smooth.
Quickly dip a frozen cheesecake pop in the melted chocolate, swirling quickly to coat it completely. Shake off any excess into the melted chocolate. If you like, you can now roll the pops quickly in optional decorations. You can also drizzle them with a contrasting color of melted chocolate (dark chocolate drizzled over milk chocolate or white chocolate over dark chocolate, etc.) Place the pop on a clean parchment paper lined baking sheet to set. Repeat with remaining pops, melting more chocolate and shortening (or confectionary chocolate pieces) as needed.
Refrigerate the pops for up to 24 hours, until ready to serve.

The Best Ever Caramel

(adapted from a Bon Appetit recipe for caramel apples)

1 1-pound box dark brown sugar
1 cup (2 sticks) unsalted butter, room temperature
1 14-ounce can sweetened condensed milk
1 cup dark corn syrup
1/2 teaspoons vanilla extract
1/4 teaspoon salt
Whipping cream (if necessary)

Combine all ingredients except for the whipping cream in heavy 2 1/2-quart saucepan (about 3 inches deep). Stir with wooden spatula or spoon over medium-low heat until sugar dissolves (no crystals are felt when caramel is rubbed between fingers), occasionally brushing down sides of pan with wet pastry brush, about 15 minutes.

Attach clip-on candy thermometer to side of pan. Increase heat to medium-high; cook caramel at rolling boil until thermometer registers 236°F, stirring constantly but slowly with clean wooden spatula and occasionally brushing down sides of pan with wet pastry brush, about 12 minutes. Pour caramel into metal bowl (do not scrape pan). Submerge thermometer bulb in caramel; cool, without stirring, to 200°F, about 20 minutes.

If caramel becomes too thick to dip into, add 1 to 2 tablespoons whipping cream and briefly whisk caramel in bowl over low heat to thin.

del.icio.us Tags: ,